Installing a conduit in an existing concrete slab demands precision in the construction field. This comprehensive guide on “How to Install Conduit in Existing Concrete Slab” will walk you through every critical step: from gathering the right tools and materials, meticulous preparation, and accurate marking, to executing precise cuts, ensuring a clean trench, strategically placing and securing the conduit, and finally, the sealing and finishing touches to integrate the conduit with the concrete.
Table of Contents
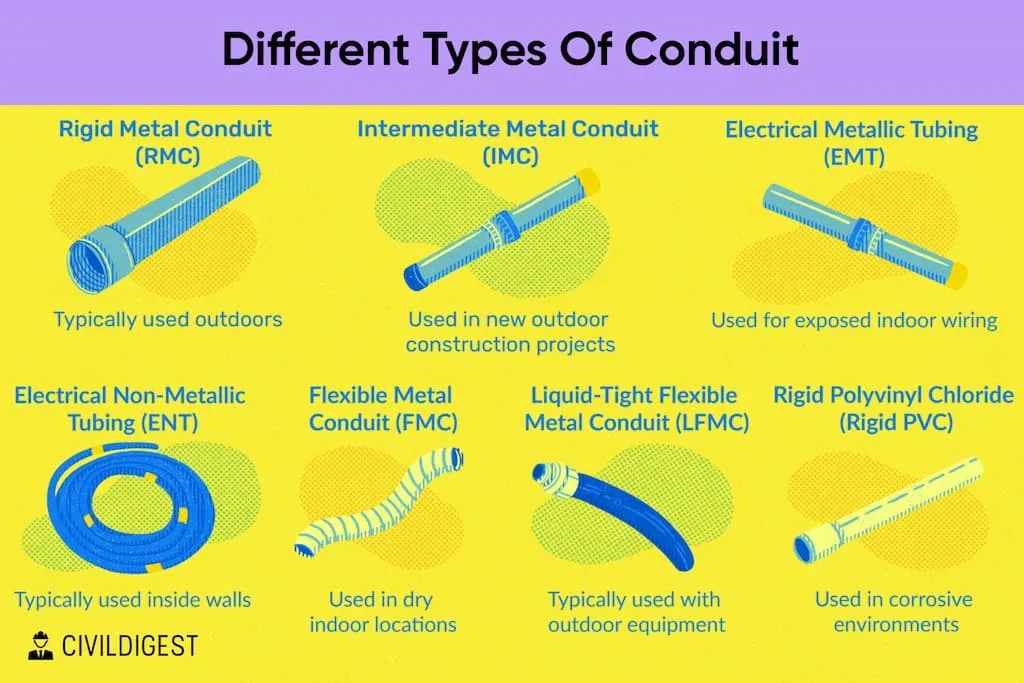
Tools and Materials Needed
Before starting the installation process, gather the necessary tools and materials to ensure a smooth and efficient workflow.
List of Essential Tools and Materials:
- Concrete saw
- Angle grinder with a diamond cutting wheel
- Measuring tape
- Construction pencil or chalk
- Chalk or string line
- Sledgehammer or masonry hammer
- Concrete trencher or excavator
- Trenching spade or pry bar
- Conduit pipe and fittings
- Conduit clamps or hangers
- Electrical conduit bender
- Plumbing conduit reamer
- Masonry adhesive or conduit sealant
- Masonry trowel
- Ready-mix concrete
- Freshwater source or hose
- Protective construction gloves and safety goggles
- Hard hat or safety helmet
Step 1: Preparation
Before delving into the process of installing conduit in a concrete slab, preparation remains paramount.
Measure and Purchase Pipe
To start, gather detailed drawings of your home or the specific building you’re working on. These schematics will guide you in determining where the pipes lie underneath the concrete slab.
| Procedure | Details |
| 1. Analyze Drawings | Examine the blueprints of the building to understand its layout. |
| 2. Measure Accurately | Utilize a measuring tape to plot the exact location of the pipe beneath the slab. |
| 3. Mark the Area | Use construction chalk or spray paint to demarcate the intended route for the conduit. |
| 4. Purchase the Pipe | Ensure the conduit aligns with the material and quality of existing pipelines, if not superior. |
Accuracy during this phase is vital. Ensure you’re exact in your measurements to circumvent any costly mistakes later. Always cross-check the position of current pipes before initiating the conduit installation.
General Preparatory Measures
Here are key measures to institute:
- Locate the Installation Spot: Pinpoint the precise area for the conduit. Consider both the building’s layout and the required electrical or plumbing networks.
- Identify Existing Utilities: Before making any cuts into the concrete, establish the position of current utility lines. This ensures no accidental damages occur.
- Utility Shutdown: If the installation necessitates cutting through the concrete, halt any connected utilities for safety.
- Ready Your Tools: Organize all necessary tools and materials mentioned in the preceding section.
- Safety First: Equip yourself with protective gear, including gloves, eyewear, and a helmet.
Taking time for adequate preparation minimizes risks and boosts the efficiency of the installation.
Step 2: Marking and Measuring
Marking and Measuring is an essential precursor to any cutting or installation task. Especially with drain lines, they must remain in a straightforward layout, minimizing convolutions for efficient conduit integration.
| Procedure | Description |
| 1. Determine the Center | Locate the midpoint of the intended conduit line, from its start to its endpoint. |
| 2. Mark the Center | Highlight the identified midpoint with an ‘X’ using spray paint. |
| 3. Demarcate the Conduit’s Path | Draw two parallel lines flanking the center to establish the complete mark for the conduit’s pathway. |
Steps for Accurate Marking and Measuring
Once initial marking is done, ensure a comprehensive measurement process with the following steps:
- Measure Slab Dimensions: Utilize a measuring tape to gauge both the length and width of the concrete region where the conduit will traverse.
- Highlight Start and Finish: Demarcate the conduit’s initiation and termination points on the slab using construction-specific markers.
- Mark Bends and Turns: Should the conduit necessitate any diversions, pinpoint those regions accordingly.
- Establish a Guideline: Merge the marked sites with a chalk line, offering a lucid, linear guide for any impending cut or excavation.
- Depth Determination: Ascertain the conduit’s depth based on the gauge and variety of cables or pipes intended for installation. This depth plays a pivotal role in ensuring safety and functionality.
- Depth Marking: Indicate the deduced depth on adjacent walls or trench boundaries, offering a clear excavation reference.
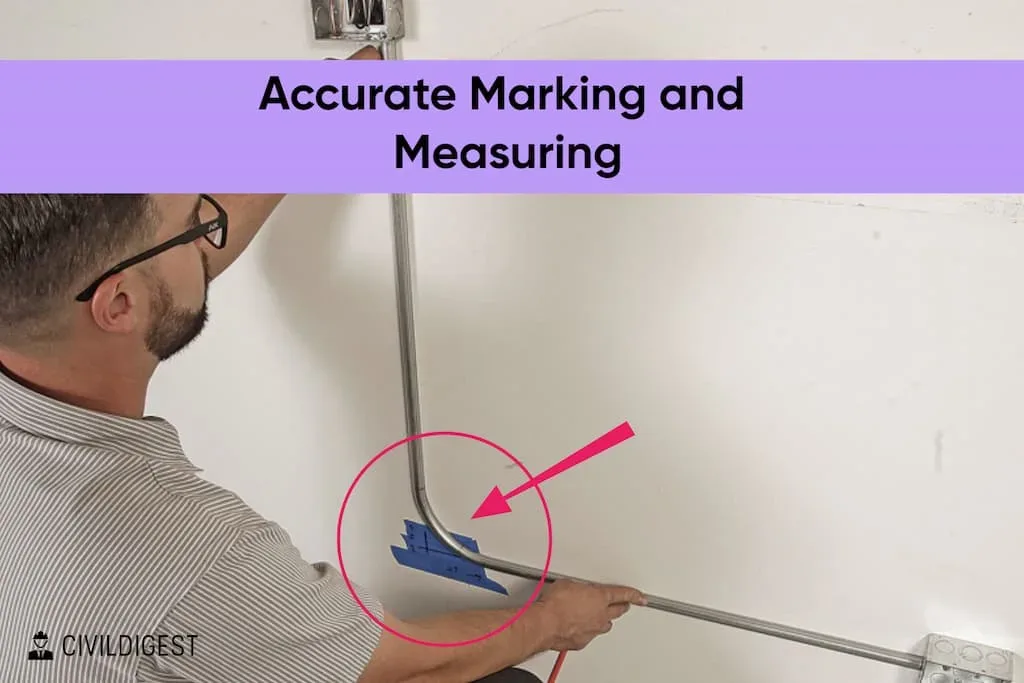
Never underestimate the significance of precise marking and measurement in this operation. Every mark, every measurement inch matters. Dedicate ample time to this phase, consistently revisiting measurements, guaranteeing that the conduit aligns perfectly with its intended purpose and placement.
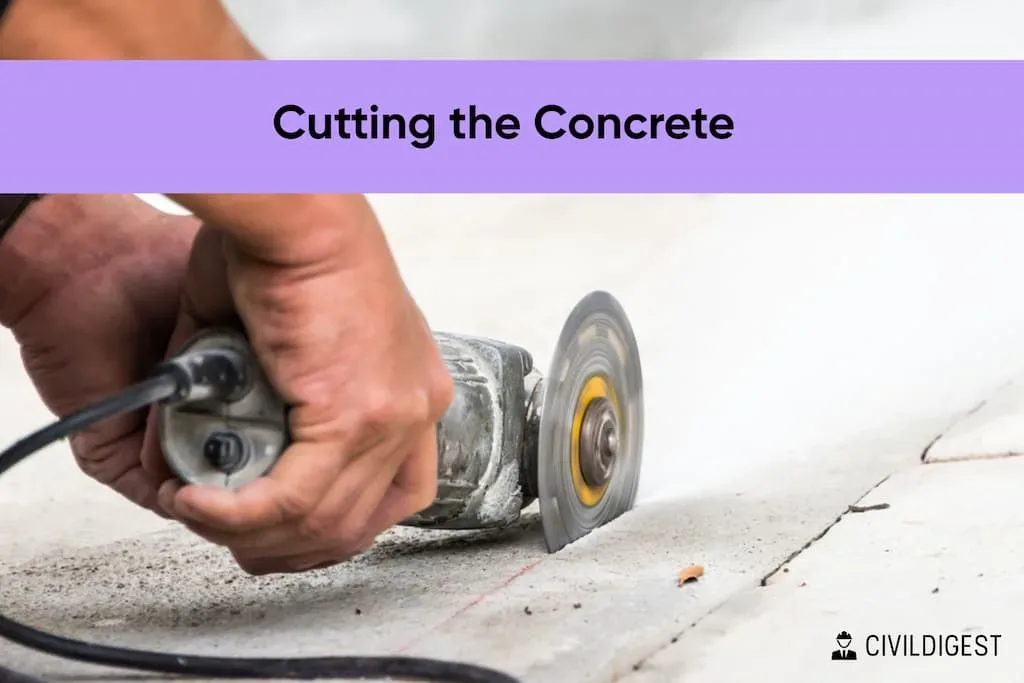
Step 3: Cutting the Concrete
Transitioning from markings to actual cuts requires absolute focus. Let’s decode the most effective approach to cutting concrete.
| Procedure | Description |
| 1. Safety First | Before initiating, don safety gloves and eyewear to guard against concrete splinters and dust. |
| 2. Choose the Tool | For thinner slabs (less than 4 inches), an angle grinder equipped with a diamond blade proves effective. Ensure adherence to manufacturer guidelines while operating. |
| 3. Alternative Tool | For thicker slabs or precision demands, a concrete saw is recommended. It assures straighter, cleaner cuts. |
| 4. Initiate the Cut | Begin the cut at one extremity of the marked line, methodically progressing to the opposite end. |
| 5. Addressing Bends | If conduit pathways necessitate turns, employ suitable cutting tools for the task. Concrete coring machines might be needed for specific shapes. |
Concrete cutting is no casual feat. It’s intensive and demands unwavering attention. Abide by the safety protocols, comprehend the slab’s thickness, and select tools judiciously. Maintain an unhurried pace, ensuring each cut is exact.
Step 4: Clearing the Trench
The fundamental step post-cutting is ensuring a clean and hassle-free conduit installation environment.
| Procedure | Description |
| 1. Debris Removal | Use shovels or excavators to dispose of loose concrete, dirt, or other trench debris. |
| 2. Trench Inspection | Assess the trench for sharp protrusions or uneven surfaces. Use trowels for leveling. |
| 3. Compacting Deep Trenches | For deeper trenches, employ a trenching hoe or digging bar to compact the base, ensuring stability. |
| 4. Width Confirmation | Ensure trench width accommodates the conduit, and fittings, and allows easy future maintenance. |
| 5. Waterproofing (if required) | For moisture-prone zones, apply a waterproof sealant to trench walls to shield the conduit. |
| 6. Handle Rebar Reinforcements | If rebar reinforcements are present, extra care is needed during cutting. This steel reinforcement boosts concrete strength. |
| 7. Break & Remove | Post-cutting, use sledgehammers or demolition hammers to fragment the concrete. Lift and dispose of concrete chunks. |
| 8. Soil Trenching | If needed, dig further using mechanical diggers or hammer drills to achieve the desired trench depth. |
Preparing a conducive environment for the conduit, ensuring its long-term functionality, and being mindful of potential reinforcements in the concrete, are all paramount.
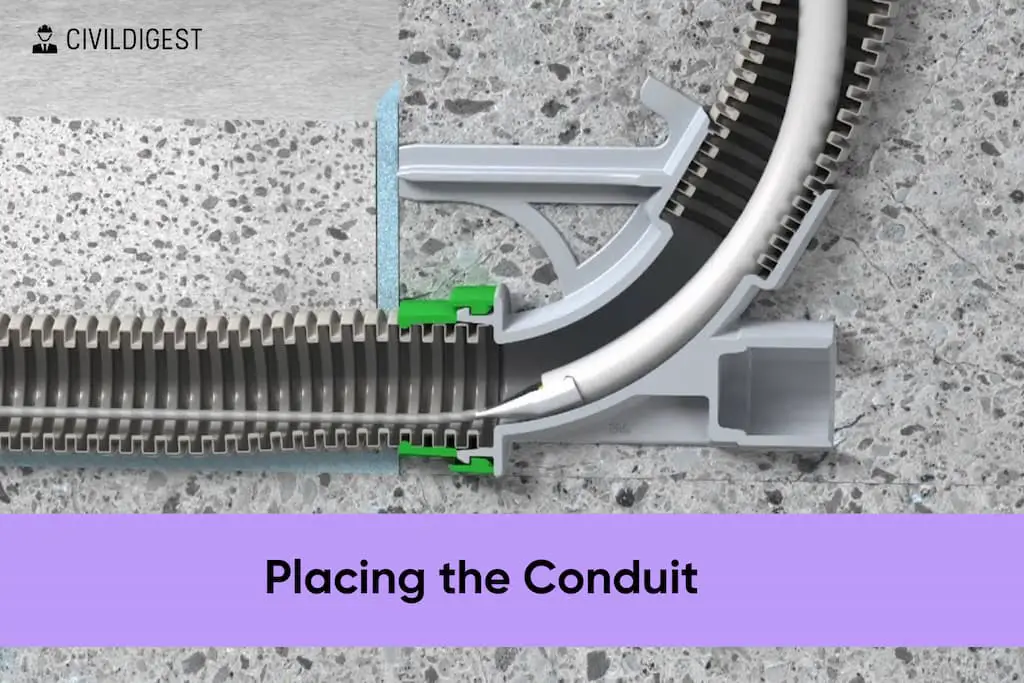
Step 5: Placing the Conduit
Having prepared the trench, it’s crucial to accurately place and install the conduit. Precision at this stage ensures seamless conduit functionality.
| Procedure | Description |
| 1. Measure Conduit Length | Establish the conduit length by measuring between the start and endpoints. |
| 2. Cut Conduit | Use a conduit cutter or saw to trim the conduit to the required length. |
| 3. Positioning | Lay the conduit in the trench, aligning with guidelines and following bends. |
| 4. Bending for Electrical Conduits | Use conduit benders for smooth bends. Adhere to bending guidelines specific to conduit type and size. |
| 5. Expanding for Plumbing Conduits | Utilize a conduit expander for plumbing connections, ensuring secure fittings. |
| 6. Level and Straighten | Verify the conduit’s alignment using a level. Adjust for straightness to ensure smooth internal flow. |
| 7. Ensure Adequate Protrusion | The conduit should extend a minimum of six inches above the concrete surface. |
| 8. Handle Twists and Turns | If bends are inevitable, install high-quality pipe joints. Pre-measure to avoid disruptions. |
The process of placing the conduit demands attention to detail. Adequate measurements, ensuring the conduit’s straightness and correct installation techniques contribute to a resilient and effective conduit system.
Step 6: Securing the Conduit
Prevention of debris ingress is paramount when setting up conduits. Protecting the openings is crucial for a problem-free installation.
- Immediately after placement, cover pipe openings with tape.
- Blocking the mouth prevents debris from entering, which can obstruct the conduit.
- Debris-filled conduits can necessitate disruptive rework, impacting project timelines.
- A sealed conduit ensures a clean path when eventually running wires or pipes inside.
Conduit Securing Process
Every conduit, electrical or plumbing, must be securely fastened to avoid displacement and future issues.
| Procedure | Description |
| 1. Strap Selection | Opt for conduit straps or clamps suitable for the specific conduit type. |
| 2. Strap Spacing | Secure the conduit at regular intervals, considering its size and weight. |
| 3. Prevent Sagging | Ensure tight securing to avert sagging or movement over time. |
| 4. Electrical Conduit Straps | For electrical conduits, choose straps designed specifically for them to provide optimal support. |
| 5. Plumbing Conduit Clamps | For plumbing conduits, select plastic or metal clamps compatible with the conduit material. |
| 6. Re-check Alignment | After securing, validate that the conduit remains level and straight. |
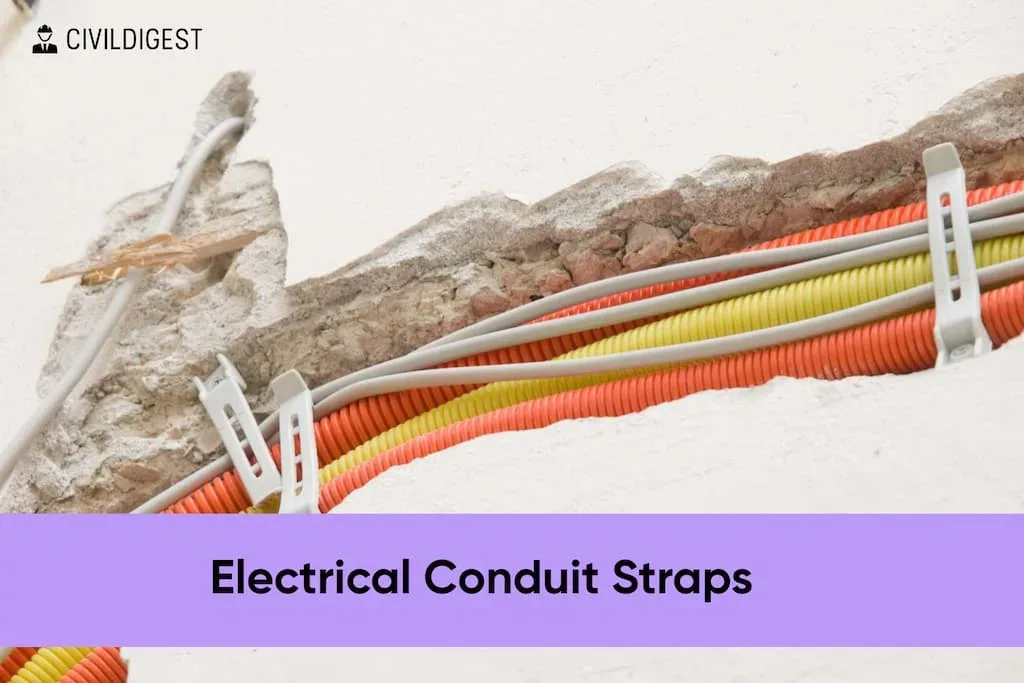
A well-secured conduit protects internal electrical and plumbing systems.
Step 7: Sealing and Finishing
The conduit must be shielded and integrated into the concrete slab to finish the installation. Proper sealing prevents external damage.
| Step | Action |
| 1. Inspection | Examine the conduit for gaps or openings alongside trench walls. |
| 2. Sealant Application | Use conduit adhesive or sealant to fill any discovered gaps. |
| 3. Sealant Smoothing | Ensure an even finish with a trowel or putty knife. |
| 4. Drying Period | Let the sealant dry as per the manufacturer’s guidelines. |
| 5. Concrete Layering | Optionally, apply concrete mix over the trench for a consistent finish. |
| 6. Leveling Concrete | Utilize a trowel to blend the new concrete with the existing surface. |
| 7. Concrete Curing | Allow the concrete to harden, adhering to manufacturer recommendations. |
| 8. Clean-Up | Post-finishing, ensure the area is free from debris and excess materials. |
Starting with soil in the trench is crucial. When you use a hand shovel, you can be precise. Try to get a level that is the same as the floor. If the pipe sticks out above the current floor level, you might want to level the whole floor. After soil placement, pour concrete to envelop the installation. Setting time depends on concrete volume. During this time, don’t touch the area so you can get the desired finish.
Every step of sealing and finishing makes the work stronger and keeps moisture, dust, and other things from getting in. This careful process makes sure that the concrete slab looks good and lasts for a long time.
Conclusion
Conduit installation within an existing concrete slab demands precision, expertise, and adherence to best construction practices. From trenching to sealing, each step plays a crucial role in ensuring a robust and durable setup. Properly installed conduits enhance the system’s lifespan, reduce maintenance woes, and elevate the quality of the overall construction project.