This is the second article in a series of articles on concrete repair work. Here we are going to discuss in detail the recommended rectification method for Type 1 and Type 2 cracks.
Table of Contents
Rectification of Type 1 Cracks
No rectification is required for type 1 or hairline cracks.
Rectification of Type 2 Cracks
In order to repair surface cracks, both Sika® Microcrete-2000 and Mapefill GP can be used as the grouting material.
Let’s learn the surface crack repair method for a maximum concrete grade of C40/50 using Mapefill GP.
Concrete repair work-Rectification of surface cracks using Mapefill GP
- Mapefill GP is a non-shrink general-purpose grout that is ideal for grouting cracks and voids in structural elements such as patching up honeycombs in concrete, filling gaps in precast parts, and grouting base plates in bridge bearings.
- Recommended for surface cracks.
- It is a pre-blended powdered grout made of high-strength cement, graded aggregates with a diameter of 1 mm, and distinct additives containing an expansive agent.
Area Preparation
- To reveal a sound surface, hack and remove the weak concrete.
- In the case of cracks, perform V-cutting and chipping to ease grout application and ensure good bonding.
- Concrete surfaces should be clean and devoid of oil, grease, laitance, and particles that are loosely adhered.
- Create and install formwork that includes a sufficient inlet, level checking, a sealing opening, and a drain out plug. Formwork and openings must be properly sealed.
- Create a platform on the upper side to facilitate grout flow (if necessary).
- The substrate must be properly soaked for a few hours before grouting or repair work begins by filling the formwork with clean water. Before beginning work, drain the water.
Mixing
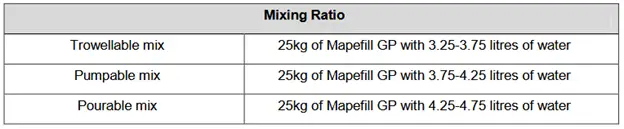
- Pour up to 80% of the required water into a clean container and continually add Mapefill GP. To create the proper mix, add the remaining water.
- Mix for 1 to 2 minutes with a heavy-duty mixer; remove any powder that is not fully blended from the edges of the concrete mixer; remix for another 2 to 3 minutes until a fluid, homogeneous paste is achieved.
- A grout mixer or a mechanical mixer, depending on the quantities to be created, can be employed, with care taken to avoid the formation of air bubbles.
- Hand mixing is not suggested.
Rectifying method
- As mentioned earlier, prepare the surface.
- Immediately pour the free-flowing mortar into the prepared formwork.
- Mechanically vibrating the grout is not required.
Curing
- The exposed surface of grout must be protected from rapid water evaporation, which can lead to the formation of surface cracks. Spray water or apply an anti-evaporant to areas exposed to the air for the first 24 hours of cure.
Since we assume the minimum cover is 30mm (for inside building cores, shear walls, slabs, and stairs), which is more than the maximum depth for a surface crack (25 mm), we expect no reinforcement to be exposed. Hence, the application of a reinforcement corrosion protection agent is not necessary.
However, it is recommended to apply a water-proofing and bonding agent (BARRA EMULSION 57D) prior to the application of the grout.
EMACO® 157D PRIMER (BARRA EMULSION 57D)
It is an aqueous emulsion of styrene-butadiene copolymer latex that has been carefully developed for use in cementitious mixtures to promote wear resistance, durability, waterproofing, and bonding.
Area Preparation
- Concrete surfaces should be clean and devoid of oil, grease, laitance, and particles that are loosely adhered.
- Before applying EMACO 157D PRIMER, properly wet the concrete substrate to completely saturate the pores with water.
Mixing
- Before using, give it a good stir.
- The mixing must be done in a pan-type mixer or a low-speed drill fitted with an appropriate paddle. Hand mixing is not advised.
- Mix the emulsion according to the manufacturer’s instructions, using 1 part EMACO 157D PRIMER and 2 parts cement by volume, until it is lump-free and creamy.
Application as a bonding primer
- To work the bonding slurry properly into the damp surface, use a stiff brush. This slurry should not be applied at thicknesses greater than 2mm.
- Wet-on-wet mortar must be applied. If the slurry dries, a second slurry coat needs to be applied.
In our next article, we will discuss how to rectify surface cracks on concrete up to a maximum grade of C50/60 by using SIKA® MICROCRETE-2000 as the grouting agent.
See this: Concrete Repair Work – Part 1
See this: Concrete Repair Work – Part 3
See this: Concrete Repair Work – Part 4
See this: Concrete Repair Work – Part 5
See this: Concrete Repair Work – Part 6